Creating MQTT profile.
Before you start. You need MQTT broker in order to communicate with MQTT devices. “Mosquito” is one of the most popular MQTT brokers. There is plenty of information online of how to download and install it both in Linux and Windows environment. There is public broker that you can use temporarily to get your feet wet with MQTT https://test.mosquitto.org
This is NOT a MQTT tutorial. If you need to learn more about MQTT and to understand better how to fill the third raw of parameters below than there are plenty of online sources for that. From a practical standpoint tough using the default values does work in most cases.
In HS4 go to Plugins –> Big6 –> Profiles configuration
Select the MQTT tab at the top and click “+” to create a new MQTT profile or “edit” to update an existing one.

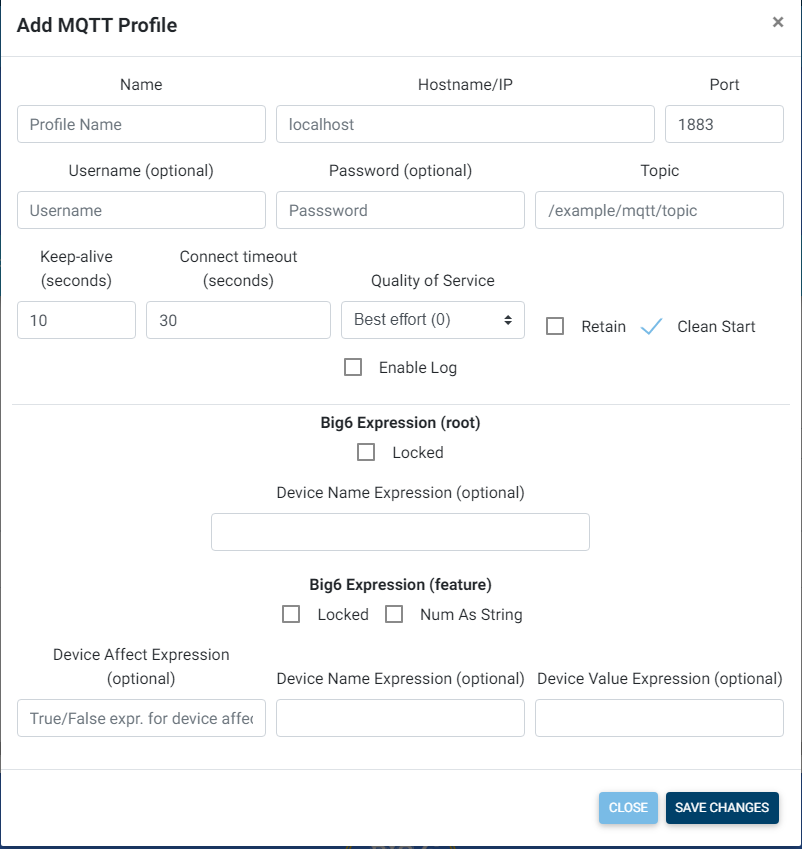
Name. Pick the name of the MQTT profile. It will be used for all future references and (by default) for the names of HS4 devices created by Big6. We will use the name “MyMQTT” in the examples below.
Hostname/IP. Enter here the address of the computer where your mosquito broker is running. Examples: https://test.mosquitto.org or 192.168.1.253
Port: Enter 1883 here which is the default port for MQTT or enter the port number that your mosquito is running on if different than 1883 (unlikely and not recommended).
Username/Password Enter your credentials here only if your mosquito broker is setup for password protected operations. Leave blank otherwise.
Topic. This is mandatory field essential for MQTT operations.
- In MQTT output profiles the topic must match the topic that your peripheral devices are listening to. Or you can pick any topic name here and go to your MQTT listening devices and enter the same topic there.
- In MQTT input profiles the topic must match exactly the topic that your MQTT devices are publishing to.
Examples of topic names:
home/relays/input
home/relays/output
IMPORTANT !
Big6 supports wild cards (+) and (#) in the topics for profiles. (+) is wild card for single level while (# ) is for multiple levels
home/relays/ + will substitute for
home/relays/input
home/relays/output
but not for
home/relays/output/positive
whereas
home/relays/# will substitute for all of the above
Wild cards will work automatically for input data subscribing to all topics covered by the wild cards. There are provisions in Big6 MQTT actions to provide replacement for the (+) wild card as the action (output) must go to a specific topic not to groups of topics. Up to 3 wild cards are supported.
Keep alive: Default is 10 sec. change if and as needed, but before doing so please make sure that you understand how MQTT works, how is your particular network organized and what will be the effect of changing it.
Connect timeout: Default is 30 sec. Change if and as needed.
Quality of services QoS: There are three levels of QoS in MQTT 0, 1 and 2. Pick the one you like from the drop down box. Level 0 is the most basic, least demanding and least reliable whereas level 2 guarantees delivery but also may consume more resources and bandwidth. For practical purposes level 0 works well especially if your Mosquito broker is on your network. However if your peripheral MQTT devices experience frequent power outages or lousy WiFi connection than level 1 or 2 maybe a better choice. The “Clean start” box must be unchecked if you are going level 1 or level 2 otherwise it will negate the QoS effect.
Retain: This checkbox is valid for output MQTT profiles. If this box is checked than the last message sent will be retained by the MQTT broker to be delivered first to peripheral devices when they connect that were not online when the message was originally sent out. Only the last message sent is retained.
Clean start: If this box is checked than Big6 MQTT client will not try to find and retrieve lost messages and the MQTT broker will not care to store these for later delivery. So this box better be unchecked especially for MQTT Input Profiles. with higher level of QoS.
The rest of MQTT profile setup is covered by this page .
